|
|
JFreeChart を使ったグラフ作成 グラフ出力 |
H.Kamifuji . |
- はじめに
作成したJFreeChartクラスのオブジェクトを画像として出力したりSwingのコンポーネントとして利用する方法を確認します。
当ページでは、Linux CentOS7 の Gnome で動作テストしています。
現在(2021/08)では、JDK-16.0.2 にアップされています。一部、上位互換について、見直しを行っていきます。
現在(2023/04)では、JDK-20.0.1 にアップされています。一部、上位互換について、見直しを行っていきます。
現在(2024/10)では、JDK-23 に、アップされています。JDK-23 + jfreechart-1.0.19 で、上位互換について、見直しを行っていきます。
- 目 次
- 画像ファイルとして出力
[ 目次 ]
作成したJFreeChartクラスのオブジェクトを画像ファイルとして出力する方法を確認します。ユーティリティクラスのChartUtilitiesクラスを使用します。
ChartUtilitiesクラスのクラス図は次のようになっています。
java.lang.Object
  |
  +-- org.jfree.chart.ChartUtilities

public abstract class ChartUtilities extends java.lang.Object
abstractクラスですので直接オブジェクトを作成するのではなく、用意されているスタティックメソッドを使います。
ChartUtilitiesクラスではグラフを画像データにしてストリームとして出力したり、イメージマップを出力することが可能ですがここでは画像ファイルとして保存する方法を確認します。
PNG画像として出力
PNG画像として出力するには「saveChartAsPNG」メソッドを使います。
saveChartAsPNG
public static void saveChartAsPNG(java.io.File file,
                                  JFreeChart chart,
                                  int width,
                                  int height)
                           throws java.io.IOException
Saves a chart to the specified file in PNG format.
Parameters:
file - the file name (null not permitted).
chart - the chart (null not permitted).
width - the image width.
height - the image height.
Throws:
java.io.IOException - if there are any I/O errors.
引数には出力するファイルを表すFileクラスのオブジェクト、グラフを表すJFreeChartクラスのオブジェクト、画像の大きさを表す幅と高さの4つを指定します。
実際の使い方は次のようになります。
DefaultPieDataset data = new DefaultPieDataset();
JFreeChart chart =
  ChartFactory.createPieChart("Title", data, true, false, false);

File file = new File("./filename.png");
try {
  ChartUtilities.saveChartAsPNG(file, chart, 300, 300);
} catch (IOException e) {
  e.printStackTrace();
}
JPEG画像として出力
JPEG画像として出力するには「saveChartAsJPEG」メソッドを使います。
saveChartAsJPEG
public static void saveChartAsJPEG(java.io.File file,
                                   JFreeChart chart,
                                   int width,
                                   int height)
                            throws java.io.IOException
Saves a chart to a file in JPEG format.
Parameters:
file - the file (null not permitted).
chart - the chart (null not permitted).
width - the image width.
height - the image height.
Throws:
java.io.IOException - if there are any I/O errors.
基本的にはPNG画像の場合と同じです。引数には出力するファイルを表すFileクラスのオブジェクト、グラフを表すJFreeChartクラスのオブジェクト、画像の大きさを表す幅と高さの4つを指定します。
実際の使い方は次のようになります。
DefaultPieDataset data = new DefaultPieDataset();
JFreeChart chart =
  ChartFactory.createPieChart("Title", data, true, false, false);

File file = new File("./filename.jpeg");
try {
  ChartUtilities.saveChartAsJPEG(file, chart, 300, 300);
} catch (IOException e) {
  e.printStackTrace();
}
では簡単なサンプルを作成して試してみます。
サンプルプログラム
下記のサンプルを実行してみよう。
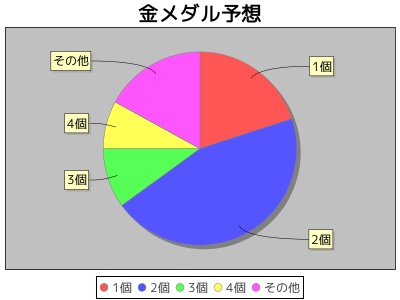
/**
 * 画像ファイルとして出力
 */
import org.jfree.chart.JFreeChart;
import org.jfree.chart.ChartFactory;
import org.jfree.data.general.DefaultPieDataset;

import org.jfree.chart.ChartUtilities;
import java.io.File;
import java.io.IOException;

public class Test1_1{
  public static void main(String[] args) {
    DefaultPieDataset data = new DefaultPieDataset();
    data.setValue("1個", 20);
    data.setValue("2個", 45);
    data.setValue("3個", 10);
    data.setValue("4個", 8);
    data.setValue("その他", 17);

    JFreeChart chart =
      ChartFactory.createPieChart("金メダル予想", data, true, false, false);

    File file = new File("./test1_1.jpeg");
    try {
      ChartUtilities.saveChartAsJPEG(file, chart, 400, 300);
    } catch (IOException e) {
      e.printStackTrace();
    }
  }
}
上記をコンパイルした後で実行すると次のように表示されます。
[xxxxxxxx@dddddddddd Output]$ javac Test1_1.java
[xxxxxxxx@dddddddddd Output]$ java Test1_1
[xxxxxxxx@dddddddddd Output]$
実行後下記のJPEG画像が出力されています。
- JPEGファイルの品質を設定
[ 目次 ]
画像として出力する場合にJPEG形式の場合は品質を合わせて設定する事が出来ます。品質を下げることでファイルサイズを小さくすることが出来ます。
「saveChartAsJPEG」メソッドを使います。前のページで使用したのと同じメソッド名ですが引数が異なります。
saveChartAsJPEG
public static void saveChartAsJPEG(java.io.File file,
                                   float quality,
                                   JFreeChart chart,
                                   int width,
                                   int height)
                            throws java.io.IOException
Saves a chart to a file in JPEG format.
Parameters:
file - the file (null not permitted).
quality - the JPEG quality setting.
chart - the chart (null not permitted).
width - the image width.
height - the image height.
Throws:
java.io.IOException - if there are any I/O errors.
引数に「quality」が追加されており、品質を設定します。設定できる値は「0.0f」から「1.0f」までのfloat型の数値で「1.0f」を指定した時が一番品質がよくサイズも大きくなります。
実際の使い方は次のようになります。
DefaultPieDataset data = new DefaultPieDataset();
JFreeChart chart =
ChartFactory.createPieChart("Title", data, true, false, false);

File file = new File("./filename.jpeg");
try {
  ChartUtilities.saveChartAsJPEG(file, 1.0f, chart, 300, 300);
} catch (IOException e) {
  e.printStackTrace();
}
では簡単なサンプルを作成して試してみます。
サンプルプログラム
下記のサンプルを実行してみよう。
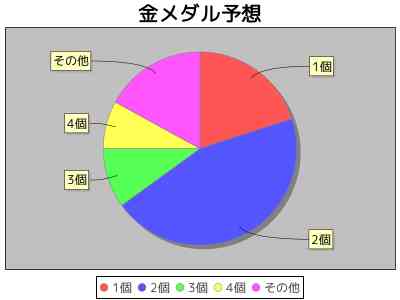
/**
 * JPEGファイルの品質を設定
 */
import org.jfree.chart.JFreeChart;
import org.jfree.chart.ChartFactory;
import org.jfree.data.general.DefaultPieDataset;

import org.jfree.chart.ChartUtilities;
import java.io.File;
import java.io.IOException;

public class Test2_1{
  public static void main(String[] args) {
    DefaultPieDataset data = new DefaultPieDataset();
    data.setValue("1個", 20);
    data.setValue("2個", 45);
    data.setValue("3個", 10);
    data.setValue("4個", 8);
    data.setValue("その他", 17);

    JFreeChart chart =
      ChartFactory.createPieChart("金メダル予想", data, true, false, false);

    File file1 = new File("./test2_1.jpeg");
    File file2 = new File("./test2_2.jpeg");
    try {
      ChartUtilities.saveChartAsJPEG(file1, 1.0f, chart, 400, 300);
      ChartUtilities.saveChartAsJPEG(file2, 0.3f, chart, 400, 300);
    } catch (IOException e) {
      e.printStackTrace();
    }
  }
}
上記をコンパイルした後で実行すると次のように表示されます。
[xxxxxxxx@dddddddddd Output]$ javac Test2_1.java
[xxxxxxxx@dddddddddd Output]$ java Test2_1
[xxxxxxxx@dddddddddd Output]$
実行後下記のJPEG画像が出力されています。

- リリースノート
[ 目次 ]- 2024/10/20 Ver=2.05 JDK_23 + jfreechart-1.0.19 で確認
- 2023/04/25 Ver=2.03 JDK_20 で確認
- 2021/08/08 Ver=1.03 JDK_16 で確認
- 2020/10/24 Ver=1.02 JDK_15 で確認
- 2017/02/12 Ver=1.01 初版リリース
- 関連ページ
[ 目次 ]