|
| matplotlib Annotations. |
H.Kamifuji . |
- Annotations
matplotlib でテキストに注釈を付ける
- Table of Contents
- Basic annotation
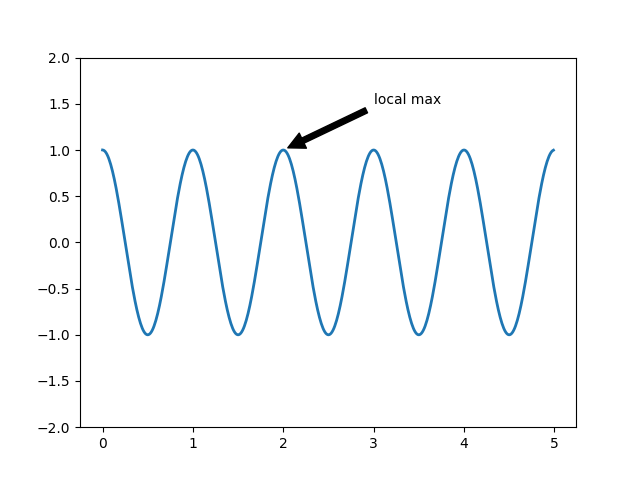
基本 text() の使用は、テキストを Axes の任意の位置に配置します。 テキストの一般的な使用例は、プロットの一部のフィーチャに注釈を付けることです。また、annotate() メソッドは、注釈を簡単にするヘルパ機能を提供します。 注釈では、考慮すべき2つの点があります:引数 xy で表される注釈付きの位置とテキスト xytext の位置です。 これらの引数は(x、y)タプルです。
Annotation Basic
argument coordinate system 'figure points' 図の左下隅からの点 'figure pixels' 図の左下隅からのピクセル 'figure fraction' 0,0は図の左下で、1,1は右上です 'axes points' 軸の左下隅からの点 'axes pixels' 軸の左下隅からのピクセル 'axes fraction' 0,0は軸の左下、1,1は右上です 'data' 軸データ座標系を使用する
たとえば、テキスト座標を小数点座標に配置するには、次のようにします。
ax.annotate('local max', xy=(3, 1),  xycoords='data',
            xytext=(0.8, 0.95), textcoords='axes fraction',
            arrowprops=dict(facecolor='black', shrink=0.05),
            horizontalalignment='right', verticalalignment='top',
            )
物理座標系(点またはピクセル)の場合、原点はFigureまたはAxesの左下です。
必要に応じて、オプションのキーワード引数 arrowprops の矢印プロパティの辞書を与えることで、テキストから注釈付きポイントまでの矢印の描画を有効にすることができます。
arrowprops key description width 点の点の幅 frac ヘッドが占める矢印の長さの割合 headwidth ポイントでの矢頭の底の幅 shrink 注釈付きのポイントとテキストから数%の距離を置いて先端を移動する **kwargs matplotlib.patches.Polygon の任意のキー、例えば、facecolor
以下の例では、xy ポイントはネイティブ座標です( xycoord のデフォルトは 'data' )。 極軸の場合、これは( theta、radius )空間にあります。 この例のテキストは、小数点座標系に配置されます。 matalotlib.text.Text keywordalignal、verticalalignment、および fontsize のようなキーワード arg は、annotate から Text インスタンスに渡されます。
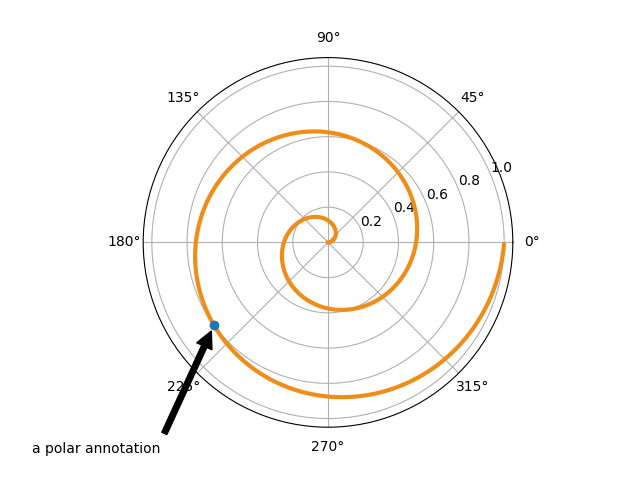
Annotation Polar
Basic annotation 、text() および annotate() をすでに読んでいない限り、進まないでください!
- Advanced Annotation
- Annotating with Text with Box
簡単な例から始めましょう。
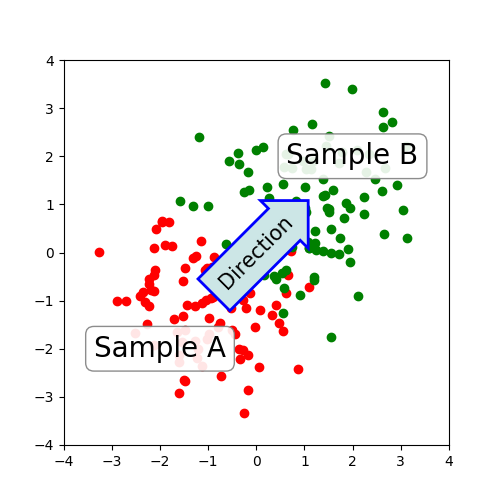
Annotation Polar
bbox_props = dict(boxstyle="rarrow,pad=0.3", fc="cyan", ec="b", lw=2)
t = ax.text(0, 0, "Direction", ha="center", va="center", rotation=45,
            size=15,
            bbox=bbox_props)
テキストに関連付けられたパッチオブジェクトには、次の方法でアクセスできます。
bb = t.get_bbox_patch()
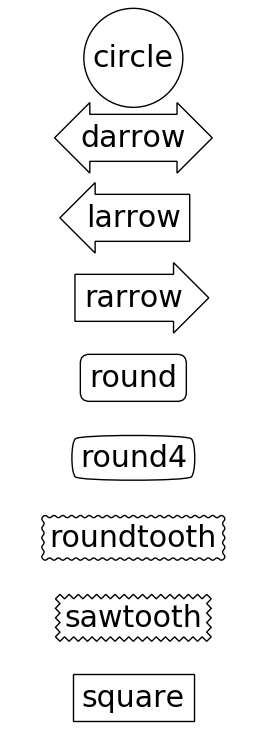
戻り値は FancyBboxPatch のインスタンスであり、facecolor、edgewidth などのパッチプロパティは通常どおりアクセスして変更できます。 ボックスの形状を変更するには、set_boxstyle メソッドを使用します。
bb.set_boxstyle("rarrow", pad=0.6)引数はキーワード引数としての属性を持つボックススタイルの名前です。 現在、次のボックススタイルが実装されています。
Class Name Attrs Circle Circle pad=0.3 DArrow darrow pad=0.3 LArrow larrow pad=0.3 RArrow rarrow pad=0.3 Round round pad=0.3,rounding_size=None Round4 round4 pad=0.3,rounding_size=None Roundtooth roundtooth pad=0.3,tooth_size=None Sawtooth sawtooth pad=0.3,tooth_size=None Square square pad=0.3
Fancybox Demo
bb.set_boxstyle("rarrow,pad=0.6")
- Annotating with Arrow
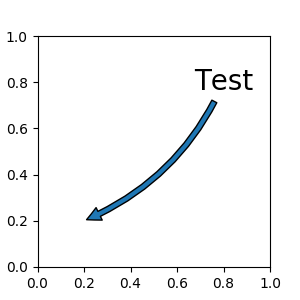
pyplot モジュールの annotate() 関数(または Axes クラスの annotate メソッド)を使用して、プロット上の 2 つの点を結ぶ矢印を描画します。
ax.annotate("Annotation",
            xy=(x1, y1), xycoords='data',
            xytext=(x2, y2), textcoords='offset points',
            )
これは与えられた座標(xycoords)の xy の点に、テキストコードで与えられた xytext のテキストを注釈する。 しばしば、アノテーションされたポイントはデータ座標で指定され、注釈テキストはオフセットポイントで指定されます。 使用可能な座標系については、annotate() を参照してください。
arrowprops 引数を指定することによって、2 点( xy と xytext )を結ぶ矢印を任意に描画できます。 矢印だけを描画するには、空の文字列を最初の引数として使用します。
ax.annotate("",
            xy=(0.2, 0.2), xycoords='data',
            xytext=(0.8, 0.8), textcoords='data',
            arrowprops=dict(arrowstyle="->",
                            connectionstyle="arc3"),
            )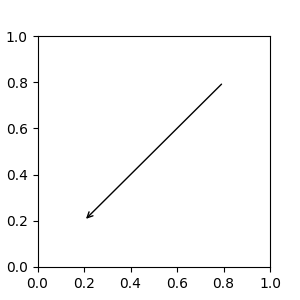
Annotate Simple01
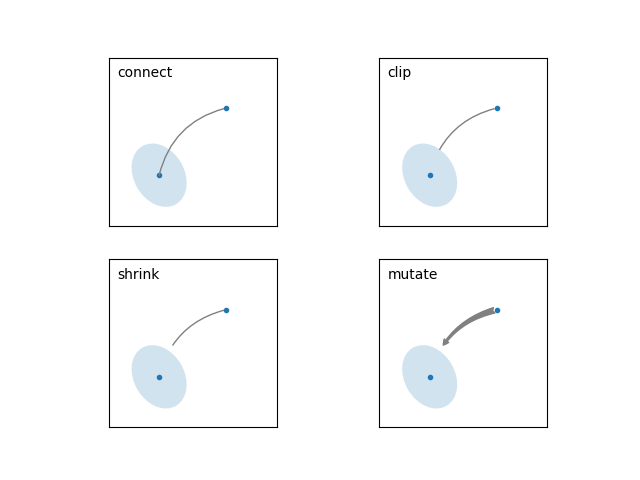
- 1. 2 点間の接続経路が作成されます。 これは、接続スタイルのキー値によって制御されます。
- 2.パッチオブジェクトが与えられた場合( patchA&patchB )、パスはパッチを避けるためにクリップされます。
- 3.パスは、与えられたピクセル量( shrinkA&shrinkB )によってさらに縮小されます。
- 4.パスは、arrowstyle キー値によって制御される矢印パッチに変換されます。
Annotate Explain
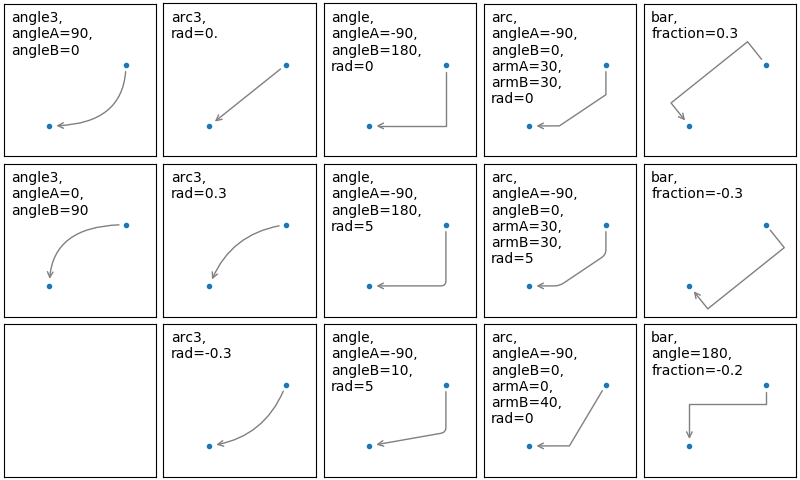
Name Attrs angle angleA=90,angleB=0,rad=0.0 angle3 angleA=90,angleB=0 arc angleA=0,angleB=0,armA=None,armB=None,rad=0.0 arc3 rad=0.0 bar armA=0.0,armB=0.0,fraction=0.3,angle=None
angle3 と arc3 の "3" は、結果のパスが2次スプラインセグメント( 3 つの制御点)であることを示しています。 以下で説明するように、いくつかの矢印スタイルオプションは、接続パスが2次スプラインである場合にのみ使用できます。
以下の例では、各接続スタイルの動作を(限定的に)示しています。 (警告:バースタイルの動作は現在明確ではなく、将来変更される可能性があります)。
Connectionstyle Demo
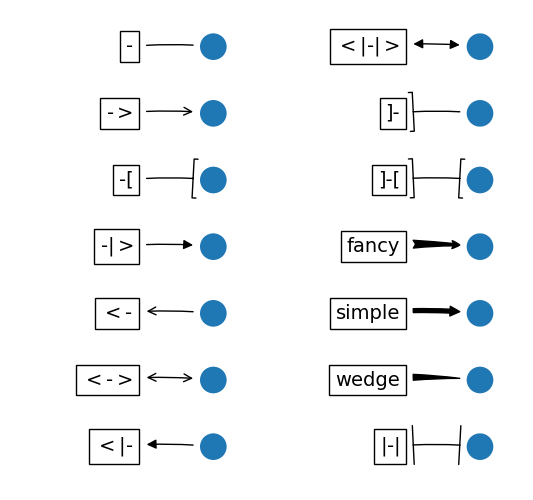
Name Attrs - None -> head_length=0.4,head_width=0.2 -[ widthB=1.0,lengthB=0.2,angleB=None |-| widthA=1.0,widthB=1.0 -|> head_length=0.4,head_width=0.2 <- head_length=0.4,head_width=0.2 <-> head_length=0.4,head_width=0.2 <|- head_length=0.4,head_width=0.2 <|-|> head_length=0.4,head_width=0.2 fancy head_length=0.4,head_width=0.4,tail_width=0.4 simple head_length=0.5,head_width=0.5,tail_width=0.2 wedge tail_width=0.3,shrink_factor=0.5
Fancyarrow Demo
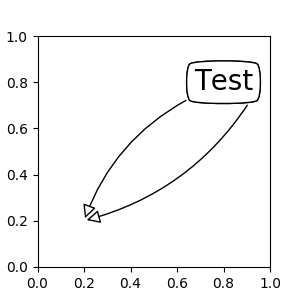
注釈文字列が与えられた場合、patchA はデフォルトでテキストの bbox パッチに設定されます。
Annotate Simple02

Annotate Simple03
Annotate Simple04
- Placing Artist at the anchored location of the Axes
Axes にアンカーされた場所に配置できるアーティストのクラスがあります。 一般的な例は伝説です。 このタイプのアーティストは、OffsetBox クラスを使用して作成できます。 matplotlib.offsetbox の mpl_toolkits.axes_grid1.anchored_artists のいくつかの定義済みクラスが利用可能です
from matplotlib.offsetbox import AnchoredText
at = AnchoredText("Figure 1a",
                  prop=dict(size=15), frameon=True,
                  loc='upper left',
                  )
at.patch.set_boxstyle("round,pad=0.,rounding_size=0.2")
ax.add_artist(at)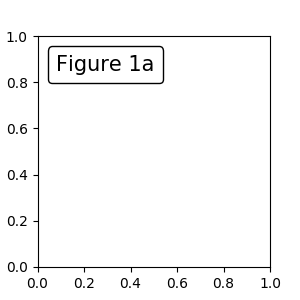
Anchored Box01
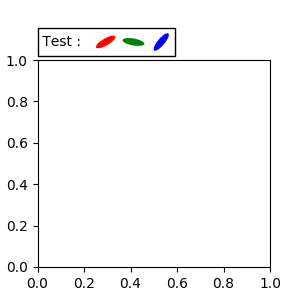
単純なアプリケーションは、アーティスト(またはアーティストのコレクション)のサイズが作成時にピクセルサイズで分かっている場合です。 たとえば、固定サイズの 20 ピクセル x 20 ピクセル(半径 = 10 ピクセル)の円を描画する場合は、AnchoredDrawingArea を使用できます。 インスタンスは描画領域のサイズ(ピクセル単位)で作成され、任意のアーティストを描画領域に追加できます。 描画領域に追加されるアーティストの範囲は、描画領域自体の配置に関係しないことに注意してください。 最初のサイズのみが重要です。
from mpl_toolkits.axes_grid1.anchored_artists import AnchoredDrawingArea

ada = AnchoredDrawingArea(20, 20, 0, 0,
                          loc='upper right', pad=0., frameon=False)
p1 = Circle((10, 10), 10)
ada.drawing_area.add_artist(p1)
p2 = Circle((30, 10), 5, fc="r")
ada.drawing_area.add_artist(p2)
描画エリアに追加されたアーティストは、トランスフォームセット(オーバーライドされる)を持たず、それらのアーティストのディメンションをピクセル座標として解釈します。つまり、上の例の円の半径は 10 ピクセルと5ピクセルです 、それぞれ
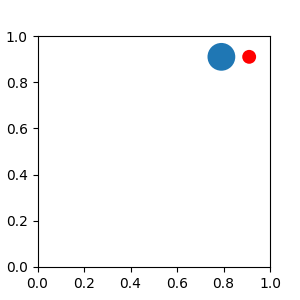
Anchored Box02
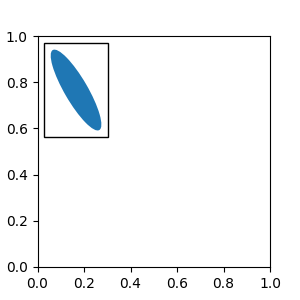
from mpl_toolkits.axes_grid1.anchored_artists import AnchoredAuxTransformBox

box = AnchoredAuxTransformBox(ax.transData, loc='upper left')
el = Ellipse((0,0), width=0.1, height=0.4, angle=30)  # in data coordinates!
box.drawing_area.add_artist(el)
上記の例の楕円は、データ座標で 0.1 と 0.4 に対応する幅と高さを持ち、軸の表示制限が変わると自動的に拡大/縮小されます。
Anchored Box03
Anchored Box04
- Using Complex Coordinates with Annotations
matplotlib の Annotationは、Basic annotation で説明されているように、いくつかのタイプの座標をサポートしています。 より高度な制御を望む高度なユーザーにとっては、他にもいくつかのオプションが用意されています。
- 1.インスタンスを Transform(変換) します。 例えば、
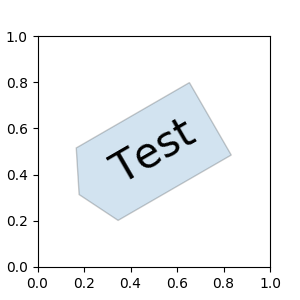
ax.annotate("Test", xy=(0.5, 0.5), xycoords=ax.transAxes)同じ
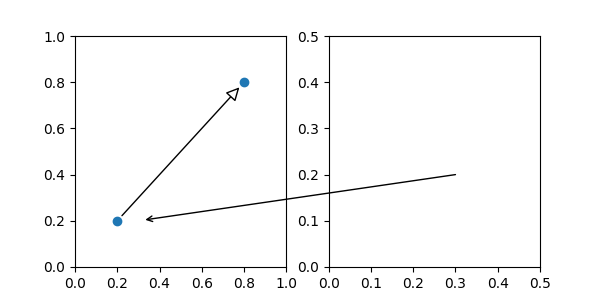
ax.annotate("Test", xy=(0.5, 0.5), xycoords="axes fraction")これにより、他の軸の点に注釈を付けることができます。
ax1, ax2 = subplot(121), subplot(122)
ax2.annotate("Test", xy=(0.5, 0.5), xycoords=ax1.transData,
             xytext=(0.5, 0.5), textcoords=ax2.transData,
             arrowprops=dict(arrowstyle="->"))
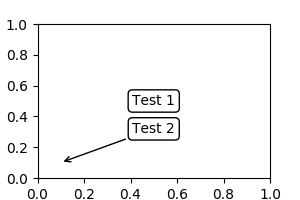
- 2. Artist のインスタンス。 xy 値(または xytext )は、アーティストのbbox( get_window_extent の戻り値)の分数座標として解釈されます。
an1 = ax.annotate("Test 1", xy=(0.5, 0.5), xycoords="data",
                  va="center", ha="center",
                  bbox=dict(boxstyle="round", fc="w"))
an2 = ax.annotate("Test 2", xy=(1, 0.5), xycoords=an1, # (1,0.5) of the an1's bbox
                  xytext=(30,0), textcoords="offset points",
                  va="center", ha="left",
                  bbox=dict(boxstyle="round", fc="w"),
                  arrowprops=dict(arrowstyle="->"))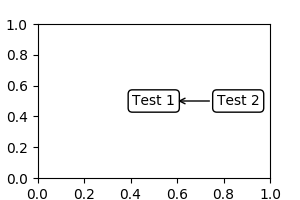
Annotation with Simple Coordinates
- 3. BboxBase または Transform のインスタンスを返す呼び出し可能オブジェクト。 トランスフォームが返された場合は 1 と同じで、bbox が返された場合は 2 と同じです。呼び出し可能なオブジェクトはレンダラーインスタンスの引数を 1 つ取る必要があります。 たとえば、次の 2 つのコ>マンドは同じ結果を返します
an2 = ax.annotate("Test 2", xy=(1, 0.5), xycoords=an1,
                  xytext=(30,0), textcoords="offset points")
an2 = ax.annotate("Test 2", xy=(1, 0.5), xycoords=an1.get_window_extent,
                  xytext=(30,0), textcoords="offset points")
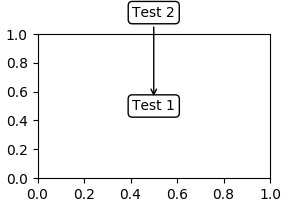
- 4. 2つの座標指定タプル。 最初の項目はx座標用で、2番目の項目はy座標用です。 例えば、
annotate("Test", xy=(0.5, 1), xycoords=("data", "axes fraction"))0.5 はデータ座標であり、1 は正規化軸座標である。 タプルのようにアーティストや変換を使用することができます。 例えば、
Annotation with Simple Coordinates 2
- 5.時々、あなたは注釈が付いている点からではなく、他の点から、いくつかの "offset points" を使って注釈をしたいと思うことがあります。OffsetFrom はそのような場合のヘルパークラスです。
Annotation with Simple Coordinates 3
- Using ConnectionPatch
ConnectionPatch は、テキストのない注釈のようなものです。 ほとんどの状況では注釈機能が推奨されていますが、異なる軸の点を接続する場合は、ConnectionPatch が便利です。
from matplotlib.patches import ConnectionPatch
xy = (0.2, 0.2)
con = ConnectionPatch(xyA=xy, xyB=xy, coordsA="data", coordsB="data",
                      axesA=ax1, axesB=ax2)
ax2.add_artist(con)
上記のコードは、ax1 のデータ座標の点 xy と ax2 のデータ座標の点xyを接続します。 ここに簡単な例があります。
Connect Simple01
- Zoom effect between Axes
mpl_toolkits.axes_grid1.inset_locator は、2 つの軸の相互接続に役立ついくつかのパッチクラスを定義します。 コードを理解するには、mpl の変換がどのように機能するかについていくつかの知識が必要です。 しかし、それを利用することは簡単です。
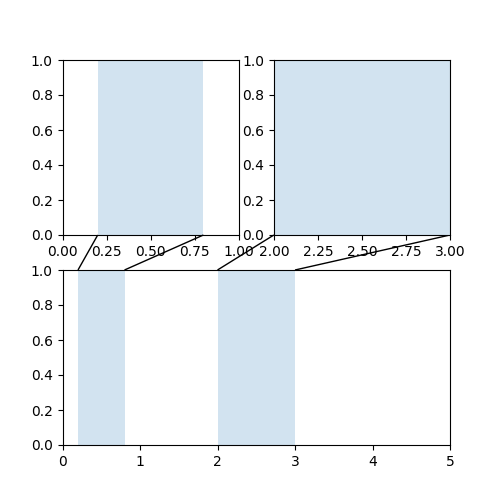
Axes Zoom Effect
- Define Custom BoxStyle
カスタムボックススタイルを使用できます。 boxstyle の値は、次の形式の呼び出し可能オブジェクトです。
def __call__(self, x0, y0, width, height, mutation_size,
             aspect_ratio=1.):
    '''
    Given the location and size of the box, return the path of
    the box around it.

      - *x0*, *y0*, *width*, *height* : location and size of the box
      - *mutation_size* : a reference scale for the mutation.
      - *aspect_ratio* : aspect-ratio for the mutation.
    '''
    path = ...
    return path
ここに完全な例があります。
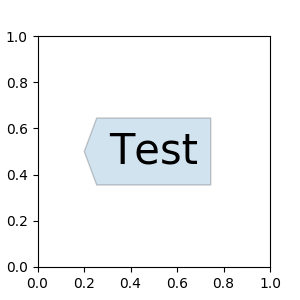
Custom Boxstyle01
Custom Boxstyle02
- 参照ページ
Annotations
- リリースノート
- 2023/03/11 Ver=1.03 Python 3.11.2 で確認
- 2020/10/28 Ver=1.01 Python 3.7.8 で確認
- 2018/11/08 Ver=1.01 初版リリース
- 関連ページ